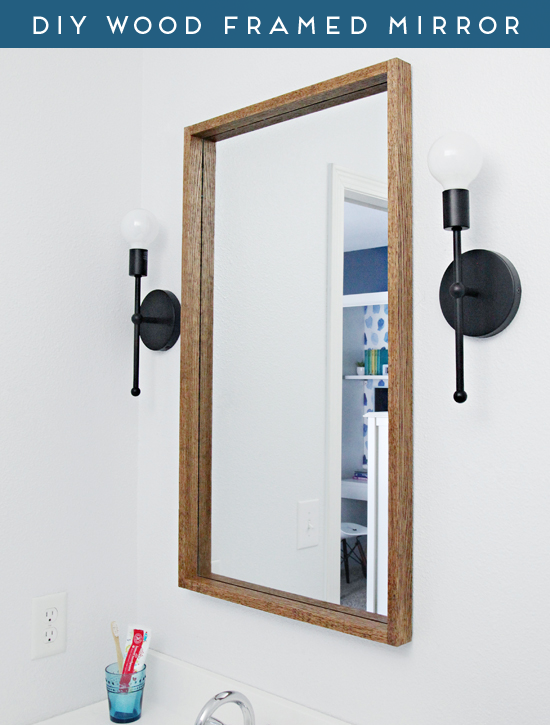
Hey there, DIY enthusiasts! Ever looked at a plain mirror and thought, "This needs some personality?" Well, you're in luck! We're about to embark on a journey to create a stunning wooden frame for your mirror, adding a touch of warmth and character to any room.
Think of it as a personalized hug for your mirror, showcasing its beauty and reflecting your unique style. It's a project that's easier than you think, perfect for a weekend afternoon, and you'll be surprised at how much impact a simple frame can have.
First things first, gather your supplies:
Mirror: The star of the show! Choose a mirror that speaks to you â€" maybe it's a vintage find, a modern masterpiece, or even an old window you repurposed.
Wood: This is where you get to unleash your creativity. You can go for classic pine, elegant walnut, rustic reclaimed wood, or even colorful MDF. Just make sure it's thick enough to support your mirror and the style you're going for.
Wood Glue: The heart of a strong frame, choose a high-quality wood glue that will hold your frame together for years to come.
Wood Screws: For added strength, especially if you're using heavier wood or a large mirror.
Saw: A miter saw will make clean, precise cuts, but a regular saw will work too.
Sandpaper: To smooth out those rough edges and give your frame a beautiful finish.
Finish: This is your chance to add the final touch. Consider stain, paint, varnish, or even a natural oil finish.
Now, let's dive into the fun part: building the frame!
1. Measure and Cut: This step is crucial! Measure the width and height of your mirror and add a few inches to each side for the frame. This will determine the length of your wood pieces. Use your saw to cut the pieces to the correct dimensions.
2. Create the Corners: This is where things get a little tricky, but don't worry, it's manageable. You'll need to create 45-degree angles on the ends of each piece of wood to form the perfect corners of your frame. A miter saw makes this easier, but you can also use a protractor and a pencil to mark the angles and then cut them with a regular saw.
3. Dry Fit: Before you start gluing, lay out all your wood pieces to make sure everything fits perfectly. This will help you avoid any surprises later.
4. Glue and Clamp: Once you're happy with the fit, apply a generous amount of wood glue to the ends of each piece and carefully join them together, making sure the corners are aligned. Secure the pieces with clamps to ensure a strong bond.
5. Screw It Together: For extra strength and stability, especially if you're using a large mirror, use wood screws to further secure the corners of your frame.
6. Sanding Time: Once the glue has dried, give your frame a good sanding. Start with a coarse grit sandpaper to smooth out any rough edges and then move to a finer grit for a polished look.
7. Final Touches: This is where your creativity really comes into play. Choose a finish that complements your frame and your mirror. Maybe you want a natural wood finish, a bright pop of color, or even a distressed look.
8. Attach the Mirror: You can use heavy-duty mirror clips, strong adhesive, or even a thin bead of wood glue to securely attach your mirror to the back of the frame.
Adding Personal Touches:
Now that you have a beautiful wooden frame, consider adding a few personal touches to make it truly your own.
Embellishments: For an extra touch of elegance, you can use decorative moulding, rope trim, or even a few strategically placed beads.
Decorative Hardware: If you want to take your frame up a notch, try adding antique-looking hinges, decorative screws, or a custom-made latch.
Customizable Features: For a truly unique frame, you can add a personal touch by burning a monogram or date into the wood, or even painting a whimsical pattern.
Remember, building a wooden frame for your mirror is about having fun and creating something beautiful and unique. So, don't be afraid to experiment and explore your creative side!
And if you're looking for inspiration, there are countless tutorials and ideas online. Browse through Pinterest, YouTube, or even look through design magazines for inspiration.
The beauty of this project is that it allows you to express your own unique style and taste. And who knows, you might even discover a hidden talent for woodworking!
So, go ahead, grab your tools, and get ready to create a stunning wooden frame that will enhance your mirror and add a touch of warmth to any room in your home. Happy crafting!
0 comments:
Post a Comment
Note: only a member of this blog may post a comment.